Maya Marble Material Tutorial

Creating a marble texture in Maya is as simple as adding a single node. But you can use a more advanced node network to further improve the look of the material. This tutorial will show you how to assign a simple marble texture to an object and then build on that simple texture by adding additional nodes.

Scene

In preparation for this tutorial, I created a very simple scene: a polygon sphere (radius: 1.000), a camera pointed at the sphere (focal length: 55), a key light off to the left of the camera and a fill light (40% intensity) from the right of the camera. Continue reading “Maya Marble Material Tutorial”

LightWave Premultiply Alpha

Render Globals - Alpha Format
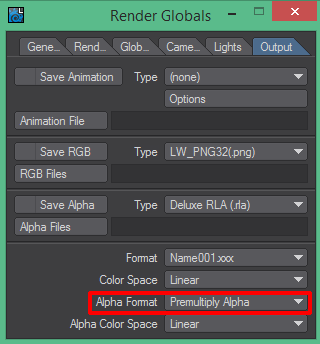
By default, LightWave 3D enables a render option that could cause headaches when you get to the compositing step of your pipeline. I am referring to the “Alpha Format” setting, which can be found in the “Output” tab of the “Render Globals” settings. When you first open a scene, LightWave sets the value to “Premultiply Alpha”.

If you are rendering your frames without any transparency and you do not need to composite your renders together, this setting will not change the look of your final result.

However, if you are relying on the alpha channel to control transparency of your renders and then compositing multiple renders into a single frame, this value becomes very important. And, unfortunately, the default is probably not the best setting to use.
Continue reading “LightWave Premultiply Alpha”

Creating a Star Field With LightWave Instancing

In LightWave 9.6 and earlier, I knew how to make a simple star field in LightWave using one-point polygons. But I was always bothered by a limitation of that technique: each star has a maximum size of one pixel when rendered. A star field would look much more realistic if some of the stars were bigger than others. Also, I recently discovered that one-point polygons do not work well with transparent objects in front of them. For instance, in my 3D Earth tutorial, the atmospheric glow around the earth would completely obscure any stars, even at the outer edge of the atmosphere where the transparency is nearly 100%.

After playing around with instancing the other day, I realized that LightWave instancing could provide a much better alternative to surfaced one-point polygons. After much testing, I found an elegant solution that only uses two objects.  Using a single luminous sphere and creating many instances of it far from the camera, I can simulate a simple star field.

I created two simple objects for my scene: a low-polygon small sphere (1m radius, 12 sides, 8 segments) and a medium-polygon large sphere (10km radius, 24 sides, 12 segments). I inverted the polygons of the large sphere, so the polygons face inwards, and set the surface to black. I surfaced the small sphere to a bright white with 0% diffuse and luminosity turned to 100%. Continue reading “Creating a Star Field With LightWave Instancing”

LightWave 3D Earth Tutorial – Part 3

LightWave 3D model and render of the earth.

This is the third and final part of my series of tutorials showing how I created a model of the Earth. If you missed part one, I showed you how to create the simple model and add the basic color/bump image maps.  In part two, I showed you how to add shader layers for the ocean, clouds, and the night city lights.

Because LightWave does not have volumetric shading support, we are going to fake an atmosphere glow using a flat, transparent object. Using the node editor, we will control the transparency based on its relation to the light vector.

Continue reading “LightWave 3D Earth Tutorial – Part 3”

LightWave 3D Earth Tutorial – Part 1

LightWave 3D model and render of the earth.

In this series of tutorials, I will show how I modeled and textured the Earth in the image above using LightWave 3D. The surfaces are primarily driven by image maps along with  some custom logic in the Node Editor.

You can download the images I used in my model in this zip file. The images are collected from a few online resources: Planet Pixel Emporium provided most of the images, and NASA helped with some others.

Continue reading “LightWave 3D Earth Tutorial – Part 1”

LightWave 3D Super Cel Shader Replacement

If you ever wanted to render an object in LightWave 3D using a cel shaded (aka “toon shaded”) look, you probably considered using Super Cel Shader. LightWave 3D has included Super Cel Shader as part of the standard installation since version 5.5 (in the mid-1990’s).

Super Cel Shader is great because it is so easy to use. You can specify up to four brightness zones on your object based on the amount of diffuse light at each point, and specify a static color brightness to use for that zone. When the object is rendered, each zone will show up as a single color band on the object, creating a traditional cartoon-shaded effect.

Continue reading “LightWave 3D Super Cel Shader Replacement”

Simple Watercolor Texture in LightWave 3D

I’ve been working on additional models for my FLCL background recreation, so instead of showing updates to that scene I will show you the basics of my technique for creating watercolor-like textures.

Watercolors mix together in interesting ways, especially when layered. As this example image shows, the layered colors don’t just mix to form a uniform color; you can see bits of the color from underneath peaking out where the top color didn’t saturate the paper. My goal with my surface was to recreate that type of watercolor technique.

Continue reading “Simple Watercolor Texture in LightWave 3D”

LightWave 3D Clay Render Tutorial

A “clay render” is a simple lighting and surfacing combination for an object or scene that causes the objects to look like they are made out of clay. Clay renders are often used to view or show off the geometry of an object without the distractions of the various surface colors.

Directions (for a single object — if you already setup your own scene, skip to step 3):

  1. Add a “floor” object to your scene. If you don’t already have one created, use Modeler and create a large flat square named “Floor”.
  2. Add your object and arrange the object so it is resting on the floor. Continue reading “LightWave 3D Clay Render Tutorial”