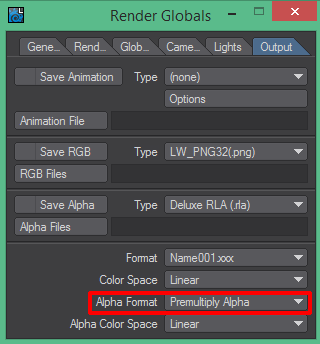
 By default, LightWave 3D enables a render option that could cause headaches when you get to the compositing step of your pipeline. I am referring to the “Alpha Format” setting, which can be found in the “Output” tab of the “Render Globals” settings. When you first open a scene, LightWave sets the value to “Premultiply Alpha”.
If you are rendering your frames without any transparency and you do not need to composite your renders together, this setting will not change the look of your final result.
However, if you are relying on the alpha channel to control transparency of your renders and then compositing multiple renders into a single frame, this value becomes very important. And, unfortunately, the default is probably not the best setting to use.
Premultiply Alpha vs. Straight Alpha
First, let me quickly explain what the “Alpha Format” setting actually changes. When your rendered images have transparent backgrounds, there will almost always be pixels that are partially transparent (in the transition pixels from a solid object to the transparent background). Without any premultiplication, those partially transparent pixels will have a RGB value that represents the pure color of the object at that pixel, before considering how it mixes with the color of any background objects. And the alpha channel will have a value that represents how opaque that pixel is, which can be used to mix the pure RGB value with any background objects. This is known as “Straight Alpha” or “Unpremultiplied Alpha”.
But the rendered values change when “Premultiply Alpha” is enabled. The alpha channel remains the same and still represents the opacity of the pixel. But the RGB values are mixed with the background color, to the degree that the background would show through. In mathematical terms: RGBpremult = (RGBpure * A) + (BG * (1 – A)), where BG is the background color and all colors/alphas are represented as numbers between 0 and 1, inclusive. As a simple example: if you had a pixel with a pure RGB value of (0,0,1), which is blue, and the alpha channel is .5 (50% opaque), and the background color is pure red (1,0,0), then the final premultiplied RGBA tuple is (.5, 0, .5, .5). That would show up on your screen as a dark purple that is 50% transparent.
To take our example pixel one step further: if you took that pixel value of (.5, 0, .5, .5) and composited it over a red background without adjusting for the premultiplication, the new effective pixel RGB from your compositing software would be (.75, 0, .25), which would be a brighter, redder purple. In this case, the red background was effectively applied to the pixel twice, first during premultiplication and then a second time during compositing. A similar problem happens if you composite that pixel over a non-red background (for example, another object passing behind the pixel): the effective pixel has some red mixed in even though the background is not seen.
Real Examples
I created a few simple renders to illustrate the problem with using premultiplied alpha channels in LightWave without compensating for it in your compositing software. I built a simple scene using two spheres, offset so the sphere on the left is in front of the sphere on the right with some overlap. The background is a solid color. I rendered each sphere separately, saved them to a PNG32 file, and combined them in After Effects along with a solid background color.
In this first example, I set the render’s background color to pure green. If you click on the image below and zoom in, you can clearly see the green halo around the objects, including the overlapping section between the red and blue spheres.

This is the exact same scene except I changed the “Alpha Format” setting in LightWave to “Unpremultiply Alpha”. Zoom in to the image and notice that the transitions between the background and the objects, and between the objects themselves, are smooth and have no halo. This is identical to what you would get if you rendered out the two spheres together in LightWave and saved it to a PNG24 file.

I used a green background in the above examples because it clearly shows up in the compositing phase. But normally, most people use a black background when rendering out their images from LightWave, which creates a much more subtle effect. However, that halo still exists and should be fixed. To illustrate the black halo, I changed the surface of the two spheres to be pure white and 100% luminous. This first result, using the “Premultiply Alpha” setting, shows a thin dark line where the left sphere overlaps the right sphere.

When I change the render setting to “Unpremultiply Alpha”, the dark line goes away, which is what you would expect from the final image (or even a single combined render).

Updating Your Workflow
If you are not compensating for the premultiplied value of your renders when compositing your final images, you need to make some adjustments to your workflow. Ultimately, you need to make sure that your compositing software knows about the correct alpha channel settings of your renders. You can do that by changing the render settings to match what your compositor expects or change the compositing settings to match your rendered images.
I prefer to set LightWave to render straight alpha images (unpremultiplied). After Effects assumes that images are unpremultiplied, so you will not need to make any changes further down the workflow to accommodate that setting. And I prefer that my rendered images remain “pure”, instead of tampering with the pixel colors using assumptions (background matte colors) that I have to filter out later in the process.
However, if you prefer to use the premultiplied alpha channels, your compositing software probably has options to compensate for it. In After Effects, for example, if you select your image/footage in the Project pane, you can change the alpha channel settings by going to File->Interpret Footage->Main. You can also change your default settings to automatically assume premultiplied (or even to ask you when you open a file with an unlabeled alpha channel) in the “Import” section of the Preferences dialogue.
A few final notes:
- If you change the setting in LightWave to “Unpremultiply Alpha”, you will no longer see any background in the render view. Instead, the background will always be black.
- If you are using “Premultiply Alpha”, never use a non-solid background color when rendering, like gradients or background images. Compositing software needs to know the matte color of the background in order to compensate for the premultiplied alpha, and that matte color needs to be a solid color.