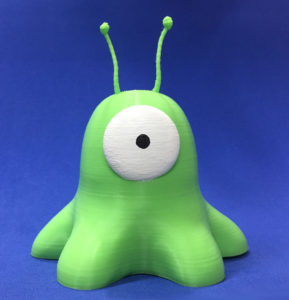
Now that I’m feeling more comfortable with my 3D printer and I even designed some of my own files to print using Autodesk Fusion 360, I decided to try something a little more challenging: modeling and printing something more organic looking.
Fortunately, my wife gave me a Wacom Intuos 3D tablet for Christmas, which comes with ZBrushCore. ZBrushCore provides some of the same functionality as the powerful ZBrush modeling program that lets you sculpt your object, in a manner similar to modeling clay in the real world. This kind of modeling is perfect if you’re making something that is supposed to look organic.
Pixologic, the maker of ZBrush and ZBrushCore, also has a free 3D modeling program that includes some of the same basic features: Sculptris. If you want to try a 3D sculpting program for free, download Sculptris and play around with it!
After watching a bunch of ZBrush tutorials, I felt ready to jump in and start modeling in ZBrushCore. Once you understand the basic tools, like Move and Smooth, the interface is pretty intuitive although very different from modelers like Maya or LightWave.
ZBrushCore has a feature called Dynamesh, which allows you to pull and stretch the model, and then recalculate the polygons to keep the mesh smooth. I stayed in a low-poly Dynamesh mode for most of the modeling until I liked the basic shape of the object, and then I switched to the more traditional subdivision mode. For this simple model, I could have just stayed in Dynamesh the entire time; but since I was trying to learn the different features, I played around with the different subdivision levels.
 Armed with my new tablet and ZBrushCore, I wanted to model something relatively simple but still fun: so I decided on a brain slug from the TV series Futurama. Because it’s a fictional life form from an animated show, I have a lot of leeway in how my final model can look and still be representative of a brain slug.
There was one thing I could not figure out in ZBrushCore: how to make the bottom perfectly flat. In order to print the brain slug, I need a perfectly flat surface to sit on the print bed. After spending over an hour trying to figure out a way to do it in ZBrushCore, I finally gave up and finished that task in LightWave 3D. Using a box and a Boolean operation, I was quickly able to chop off the bottom and make it smooth.
While in LightWave, I realized that I still had to model the antennae. Since I already had LightWave open, I quickly modeled them in Modeler using a spline and the Rail Extrude command, topped off by a simple sphere.
Then I loaded the model into Slic3r and double checked all of the print layers to make sure they were all supported. I had to make some final tweaks to the antennae spheres, otherwise the printer would try to extrude filament into thin air!
Once I had that fixed, I printed the model using some generic green PLA I bought at a local electronics store. The print turned out really well, except for some stringing between the antennae (which was easily fixed by just pulling it off by hand).
I painted the eye using some titanium white acrylic paint. I very carefully applied multiple coats until I couldn’t see the green underneath anymore.
To paint the pupil, I used the inside of a washer as a stencil and drew it on using a Sharpie. I also reapplied after it dried to make sure it was a nice, dark black.
For my first attempt at painted a 3D printed object, I’m pretty satisfied. I know I barely scratched the surface of finishing a print, but now I have actual experience painting onto PLA with acrylic, which was fun. So, in the future, I can expand on that and try better techniques.
But for now, I am going to enjoy seeing this little guy sitting on my desk!
If you want to see more details about how I made this object, watch the YouTube video I made!


